Tag Punch Star
by Donna Moore
by Donna Moore
Make a stellar focal point for any paper project with a few tools.
Supplies
Large Tag Punch
Small Tag Punch
2-way Glue Pen
Dimensionals
Cardstock for frame
Mulberry, Vellum or other light-weight paper for inner parts of the starburst
Detail Scissors
Large Tag Punch
Small Tag Punch
2-way Glue Pen
Dimensionals
Cardstock for frame
Mulberry, Vellum or other light-weight paper for inner parts of the starburst
Detail Scissors
Step-by-Step Instructions
 Step 1
Punch 16 small tags out of cardstock, leaving about 1/4" between each one. Using the large tag punch, go back over the holes made by the small punch. Line up the punch so that you can see an evenly spaced frame around each hole. Punch out 16 frames.
 Step 2
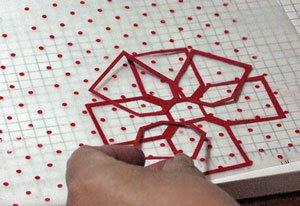
Each layer of the star will consist of 4 frames. Apply two-way glue evenly over the back of a few frames at a time. Put the sheet of lighter weight paper face-side up and carefully apply your frames in a cross-shaped pattern.
Step 3 
Follow the same process for attaching the next layer of 4 frames to the base layer. The second layer is attached to fill in the empty areas of the first cross-shaped layer.

Follow the same process for attaching the next layer of 4 frames to the base layer. The second layer is attached to fill in the empty areas of the first cross-shaped layer.
Step 4 
The points of the star will be visible when the second layer is attached. Use scissors to trim away excess.

The points of the star will be visible when the second layer is attached. Use scissors to trim away excess.
Hope you enjoy! See you next time....where the ink dries...


.png)
No comments:
Post a Comment