About Me

- Patti Safar
- Greenville, Texas
- I've been paper crafting for about 20 years. In October 2007 I joined Stampin' Up! as an independent demonstrator. I have found that I truly love stamping, more than any other craft I've tried...and I've tried them all. I'm a SAHM of 4 and I also direct a parents' day out program. Both of these "jobs" give me plenty of opportunities to pull out my stamps and inks and have a ball! I've been married to my wonderful hubby for 21 years. He gets gold stars for supporting paper crafting/stamping addictions. :)
Saturday, January 24, 2009
Shopping in your Jammies!
Starting February 1st, you can get a free..yes I said FREE...2009 Spring/Summer Idea Book & Catalog with EVERY on-line order. This is a limited offer and will end on April 30th.
I've also added a button...look to your left...just click on it and you'll be connected to my website so you can shop in your jammies....
Of course, you can still call, email, have a workshop or stop by and place an order too.
Oh and don't forget...Sale-A-Bration starts on February 1st! For every $50 you spend...you earn FREE stamps! You can also order online and receive Sale-A-Bration benefits too!
See you next time...where the ink dries....
Friday, January 23, 2009
Love Notes


Friday, January 16, 2009
More handmade gifts...

I stamped the Santa from "Jolliest Time of the Year" stamp set on acetate and colored it with paint pens. I cut it out with my Coluzzle, rolled it up and stuck it inside a glass ornament I bought at Michael's.
Then I topped it off with some red dotted ribbon and used a thin black ribbon for the hanger.
I made 11 of them..once I got going they didn't take long at all.
See you next time....where the ink dries.
Wednesday, January 14, 2009
Stationary Set

This is the front of the holder. I used "Tart & Tangy" stamp set and "Summer Picnic" designer paper. The colors are Old Olive, Bashful Blue, Real Red, and Pumpkin Pie.

This is the inside of the holder. I made 10 cards, with 5 different designs. I also included some Whisper White envelopes.


These are the cards that were included.
I'll find the directions...they're buried under all the paper scraps LOL...and post them as a tutorial...
See you next time...where the ink dries....
My apologies
I am going to try to blog more often...notice I said try. So don't give up on me yet.
I did alot of stamping and paper crafting over the holidays. Making gifts and Christmas cards. I'll post them in separate posts so they will be easier to view.
I hope each of you have a great New Year!
See you next time....where the ink dries....
Monday, November 3, 2008
Way Cool Idea ~ Just had to share!
by Donna Moore
Large Tag Punch
Small Tag Punch
2-way Glue Pen
Dimensionals
Cardstock for frame
Mulberry, Vellum or other light-weight paper for inner parts of the starburst
Detail Scissors
 Step 1
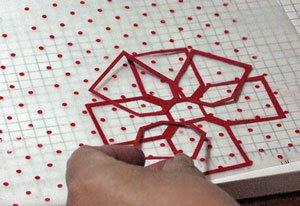
Punch 16 small tags out of cardstock, leaving about 1/4" between each one. Using the large tag punch, go back over the holes made by the small punch. Line up the punch so that you can see an evenly spaced frame around each hole. Punch out 16 frames.
 Step 2
Each layer of the star will consist of 4 frames. Apply two-way glue evenly over the back of a few frames at a time. Put the sheet of lighter weight paper face-side up and carefully apply your frames in a cross-shaped pattern.

Follow the same process for attaching the next layer of 4 frames to the base layer. The second layer is attached to fill in the empty areas of the first cross-shaped layer.

The points of the star will be visible when the second layer is attached. Use scissors to trim away excess.
Friday, October 31, 2008
Christmas Craft #1

Since the pep rally was this morning, I had time this afternoon to post my first Christmas Craft. It's a Christmas Wish List holder.
Here's the supply list and instructions. Remember it's easy to change colors or stamps to create your own version of this cute craft.
Supplies:Holiday Line up Stamp Set
Pick a Petal Stamp Set
Holiday Blitz Stamp Set
Seeing Spots Stamp Set
Totally Tab Stamp Set
5 ½ x 8 ½ Kiwi Kiss cardstock
3 x 5 ½ Patterned paper
3 x 3 ½ Riding Hood Red cardstock
3 ¼ x 2 ¾ Kiwi Kiss cardstock
3 x 3 ½ Whisper White
2 Silver Brads
10” Whisper White Grosgrain Ribbon
Kiwi Kiss Classic Stamp Pad
Riding Hood Red Classic Stamp Pad
Night of Navy Classic Stamp Pad
Yo-Yo Yellow Classic Stamp Pad
Crop-A-Dile
Round Tab Punch
Blender Pens
Snail Adhesive
Instructions:
Score 5 ½ x 8 ½ Kiwi Kiss cardstock at 3 ½, fold on score line to create a pocket. Using the Crop-A-Dile, punch a hole and insert the silver brads to keep the pocket intact.
Stamp a tab using the Totally Tab stamp set and punch out with the Round Tab punch. Adhere the tab to the far right side of the pocket flap.
Adhere the 3 x 5 ½ patterned paper (I stamped my own patterned paper on Whisper White cardstock using the Seeing Spots and Pick a Petal stamp sets) to the flap of the pocket.
Using the Holiday Line Up stamp set, stamp the image on the 3 x 3 ½ Whisper White cardstock and color using the Classic Stamp pads and Blender Pen. Stamp the snowflakes from Holiday Blitz stamp set in Night of Navy.
Adhere stamped image to 3 ¼ x 2 ¾ Kiwi Kiss cardstock and double mat with 3 x 3 ½ Riding Hood Red cardstock.
Adhere matted image to the patterned paper centering the image.
Using the snowflake from Holiday Blitz, randomly stamp on the upper back portion of the pocket (see picture).
Punch two holes using the Crop-A-Dile and insert ribbon for hanging.
Have your child or other family members and friends write down gift ideas on slips of paper and place in pocket of wish list holder.
See you next time...where the ink dries...


.png)